How to make a picture frame hanging planter
DIY project from NZ Gardener magazine
Perfect for renters or apartment dwellers, Rose Hughes’ hanging planter can be used to grow an assortment of your favourite herbs plus pretty flowering plants.

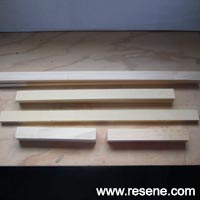
You will need: 4m of 40mm x 20mm dressed pine, 4 x 40mm corner brackets, Drop saw, Woodglue, 5g x 16mm screws, 6 x 65mm ceiling hooks, 6 x small tin buckets with handles (mine purchased online measured 11cm high x 12cm top diameter), Drill, small bit, metal bits and screwdriver, fine sandpaper, masking tape, Resene Quick Dry Primer and testpots, MEA 12 aluminium strip (optional).
Cutting lists: 2 x 820mm for the top and bottom struts, 1 X 740 mm for the centre divider, 2 x 600 mm for side struts, 4 x 280mm dividers.
Cost: $90 excluding herbs and paint.
Instructions
 Step one
 Cut all the pieces to length. Sand the ends and edges. Position the top, bottom and side struts face down, in position on a at surface.
 Step two
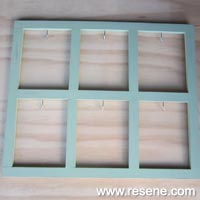
 Glue the ends and screw the corner brackets in place to create the exterior of the frame. Mark the centre of the sides and glue and slot in the centre divider. Clamp. Mark the placement for the small dividers, glue the ends and slide into position. Clamp. Allow the frame to dry.
 Step three
 Sand well and undercoat with Resene Quick Dry Primer. For the distressing effect, top coat with two or three colours. I used White, Half Gunsmoke and Ciderhouse. Allow to dry then with fine sandpaper scuff back areas on the frame where they might naturally show wear, at the corners and edges.
 Step four
Mark and drill and screw in the ceiling hooks. To hang, cut and bend the aluminium strip into a suitable bracket, drill screw holes and attach to the wall. Insert the herb or plant pots into the buckets and hang in a gorgeous arrangement!