How to make a privacy screen
DIY project from NZ Gardener magazine
A perfect way to define different garden spaces, and screen off neighbours and working areas.

You will need
Materials:
- Treated timber, cedar, macrocarpa or reclaimed timber in the following sizes (can be adjusted to suit your space):
- 3.6m of 100mm x 50mm (1 x 1.2m and 6 x 400mm)
- 2 x fence posts at 100mm x 100mm and 1.8m high
- 4 x 22mm x 22mm exterior timber at 1.7m high
- 34 x timber slats at 1.2m x 38mm x 12mm deep
- 1 top piece 150mm x 25mm, and 1.8m long
- 20 x 120mm landscaping screws or bugles
- 24 x 50mm stainless steel screws, staples or brad pins
Tools:
- Measure tape and pencil
- Sliding square
- Mitre saw or hand saw
- Drill or impact driver
- Bugle drill bit, square head drill bit and 4mm drill bit
- Brad pin gun or stapler
- Paintbrushes
Cost: $180 for timber and fixings. Base, posts and slats: Resene Woodsman Penetrating Oil in Nutmeg. Top, side timbers and some slats: Resene Lumbersider in Charcoal with CoolColour (to prolong the life of the timber).
Instructions
 Step 1
Measure up and cut your timbers to size for the base of the screen, using a drop saw or handsaw.
 Step 2
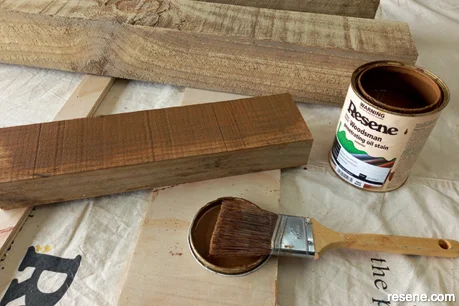
Apply two coats of stain to the base timbers, posts and slats. I used Resene Woodsman Penetrating Oil Stain in Nutmeg. Paint the 4 pieces of 22mm x 22mm and the top piece. I also painted a few slats to add interest to the screen. I used Resene Lumbersider in Charcoal with CoolColour.
 Step 3
Assemble the base of the screen as per the photo.
 Step 3a
Put the posts in the base frame and use the landscaping screws or bugles to screw together.
 Step 4
Measure out the top piece to be centred on both of the posts and screw to the top of the post with the landscaping screws or bugles.
 Step 5
Measure 20mm from the side edge of the post and mark down the post for the 22mm x 22mm timber. Pre-drill 4mm holes every 300mm and screw in to place on your mark line with the 50mm stainless steel screws.
 Step 6
Install your slats with a brad gun or staple gun to the 22mm x 22mm timber. I used an offcut piece of timber as a spacer to keep the slats the same distance apart.
 Step 7
Screw into place the covering 22mm x 22mm timber to side the pins or staples.
 Finished project
A close-up of the finished privacy screen.
Project by Jane Horne
Jane Horne and partner Simon Bartholomew design and develop projects from their studio in Christchurch, managing projects throughout the South Island.