How to make colourful kids garden furniture
DIY project from NZ Gardener magazine
Want to build some cute, colourful garden furniture for the children in your life? Rose Hughes gives a step-by-step guide.
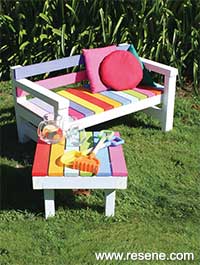
You will need: for the frame 10m x 70mm x 45mm (dressed measurement approx 65mm x 45mm), ten metres of treated pine slats 10m x 75mm x 25mm (dressed measurement approx 65mm x 20mm, screws: 8gm x 65mm and 8gm x 32mm, power saw, power drill, countersink bit, spirit level, filler, clamps, exterior glue, sandpaper, primer and paint.
Cutting list: frame - seat: 3 x 850mm and2 x 420mm, legs: 2 x 405mm and 2 x 520mm, braces: 2 x 420mm, arms: 2 x 470mm, slats: 13 x 420mm, frame – table: 2 x 420mm and 2 x 335mm, legs: 4 x 280mm, slats - 6 x 420mm.
Cost: $120.
Instructions
 Step 1
Assemble the seat as shown, making sure to countersink all screw holes and glue all joins.
 Step 2
Mark screw holes on front and back legs at 250mm from the base of leg. Drill and counter sink the screw holes. Glue, clamp and screw legs to the seat using the 65mm screws.
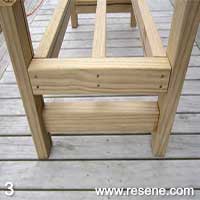 Step 3
Mark brace screw holes at 110mm from base of leg. Glue and screw into position.
 Step 4
Fill all the screw holes, and sand back once dry. Undercoat with Resene Quick Dry primer and top coat with Resene Lumbersider.
 Step 5
Cut two slats slightly shorter to fit inside the arms. Mark, drill and countersink the screw holes. Prime and paint the slats in your chosen colours. Attach the evenly spaced slats to the seat with the 32mm screws. Fill holes, sand and recoat.
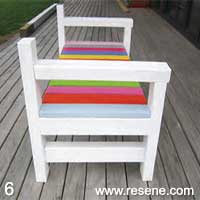 Step 6
Attach the arms by screwing into the top of the front leg with a small overhang. Use a spirit level to ensure that the arm is level. Mark and drill holes through the back leg and attach the back of the arm rest.
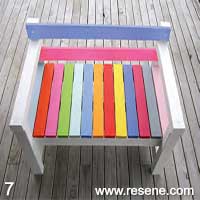 Step 7
Mark, drill and countersink the screw holes for the back slats. Prime and paint in your choice of colours. Position and screw into place.
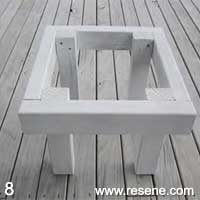 Step 8
Table - assemble as shown in the photo. Ensuring that the legs are level with the top of the table, attach to the frame at each internal corner. Prime and paint. Cut the slats, drill and countersink the holes and paint. Attach the slats, fill the holes and recoat.