made with love
From habitat highlights - issue 40, kids and pets
Colourful, yet simple projects to treat the ones you love, including those with four legs as well as two.
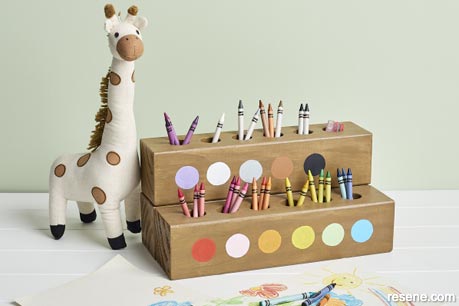
Creative station
Let the creative juices flow while still keeping things tidy with this simple organiser. Budding artists will thank you.
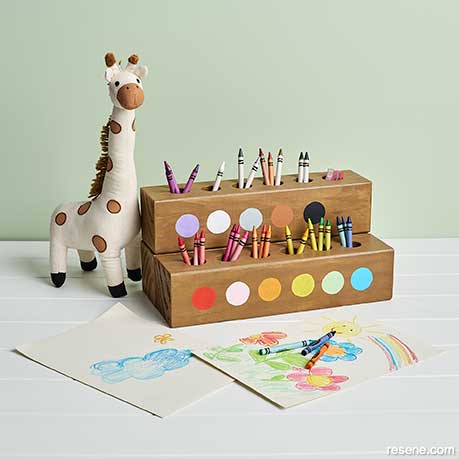
Wall painted in Resene Pale Leaf, desk in Resene Black White, holder in Resene Colorwood Bask, circles in Resene Get Reddy, Resene Princess, Resene Hi Jinx, Resene Fizz, Resene Tutti Frutti, Resene Snap, Resene Dancing Girl, Resene Cotton Wool, Resene Gull Grey, Resene Twizel and Resene Jaguar.
You’ll need:
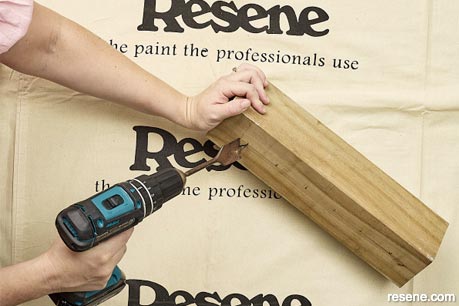
- 3x 90mm x 90mm pieces of timber, cut to 370mm in length
- Drill
- Spade drill bit, 30mm
- Sandpaper
- Pencil and ruler
- Resene Colorwood Bask
- Resene testpots in the colours of your choice for the rainbow. We used Resene Get Reddy, Resene Princess, Resene Hi Jinx, Resene Fizz, Resene Tutti Frutti, Resene Snap, Resene Dancing Girl, Resene Cotton Wool, Resene Gull Grey, Resene Twizel and Resene Jaguar
- Resene testpot brushes
- Artist’s brushes
- Wood glue
Instructions:
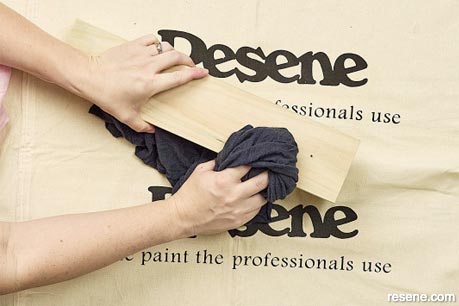
 Step one
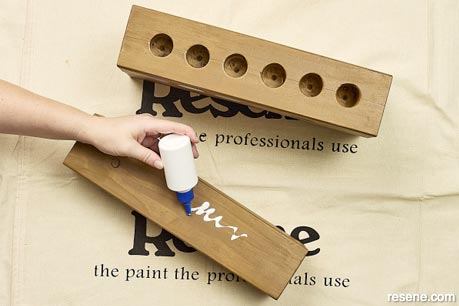
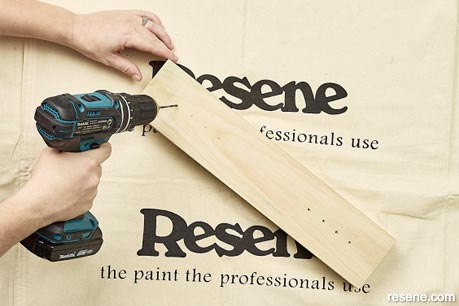
On two of the wood pieces, measure where the six holes (per piece) should go and mark with pencil. Cut the holes using the spade drill bit down to 50mm deep.
 Step two
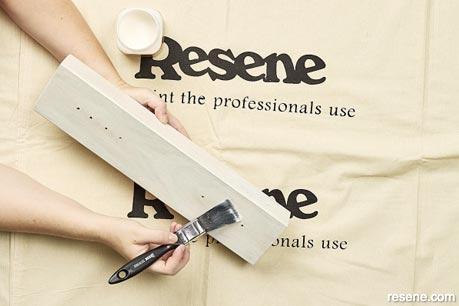
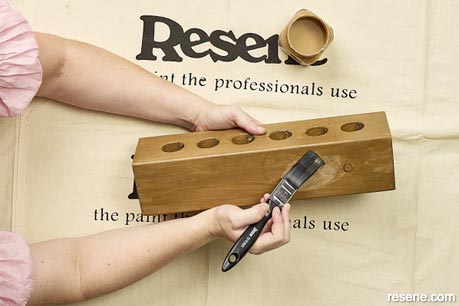
Sand the wood pieces, including the holes then wipe with a damp cloth. Stain all the wood pieces in Resene Bask. Leave to dry.
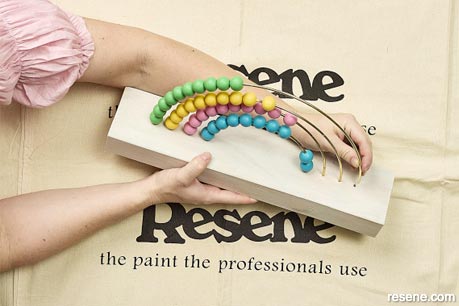
 Step three
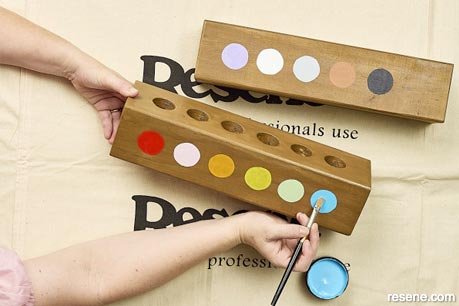
On one piece with the holes, paint the first six colours of the rainbow in circles on the front side of the piece. We used Resene Get Reddy, Resene Princess, Resene Hi Jinx, Resene Fizz, Resene Tutti Frutti and Resene Snap. On the second piece, repeat with the remaining five colours – we used Resene Dancing Girl, Resene Cotton Wool, Resene Gull Grey, Resene Twizel and Resene Jaguar. We left the last one blank to use to store erasers, pencil sharpeners, etc.
 Step four
Once dry, stack the second piece on to the piece without any holes. Glue together using wood glue.
 Step five
Glue the first piece on to the front of the wood piece without any holes. Leave to dry according to instructions.
Counting in colour: DIY rainbow abacus
This rainbow-inspired abacus is sure to inspire and make maths magical for young learners.
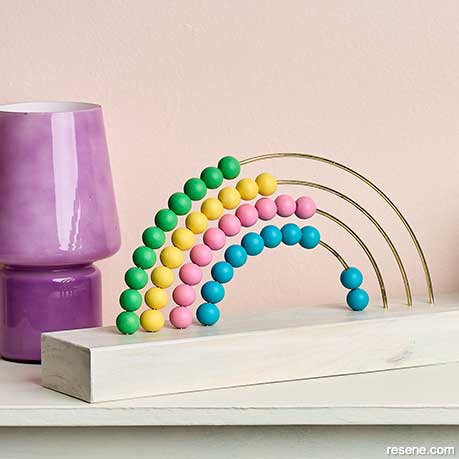
Wall painted in Resene Tuft Bush, desk in Resene Travertine, abacus base in Resene Colorwood Whitewash and beads in Resene Kermit, Resene Bright Spark, Resene Hopskotch and Resene Yabbadabbadoo.
You’ll need:
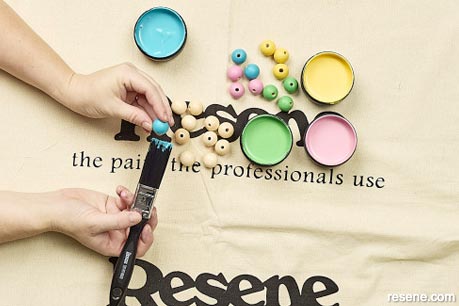
- 4 gold craft hoops – 6, 8, 10 and 12 inch, sawn in half (we cut ours with a handsaw)
- Wood beads, 20mm. If the holes aren’t big enough to string onto the loops, use a drill to widen them
- 90mm x 45mm board, cut to 410mm in length
- Resene testpots in the colours of your choice. We used Resene Kermit, Resene Bright Spark, Resene Hopskotch and Resene Yabbadabbadoo
- Resene testpot brushes
- Sanding paper
- Pencil and ruler
Instructions:
 Step one
Paint the beads. Leave to dry.
 Step two
Sand the base until smooth. Wipe with a damp cloth.
 Step three
Measure and mark eight holes for the hoops to be placed into. Drill the holes.
 Step four
Use a brush to apply your favourite Resene stain. We used Resene Colorwood Whitewash.
 Step five
String the beads onto the hoops and make sure you’re happy with the colour placement.
 Step six
Place the hoop ends into the holes.
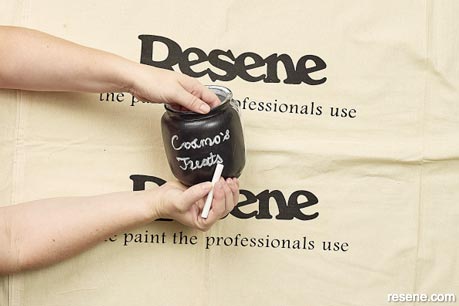
Jar of joy
Transform a basic jar into a stylish DIY pet treat container personalised to your pet.
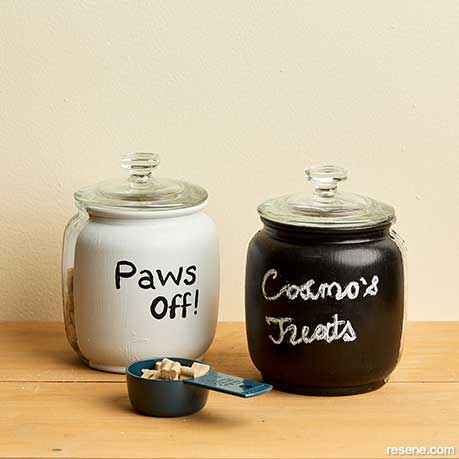
Wall in Resene Coconut Cream, shelf in Resene Colorwood Bask and jars in Resene Duck Egg Blue with Resene Indian Ink (left) and Resene FX Blackboard Paint.
You’ll need:
- Glass jar
- Washi tape
- Resene Waterborne Sureseal
- Resene FX Blackboard Paint and/or Resene testpots
- Resene testpot brushes
- Chalk
Instructions:
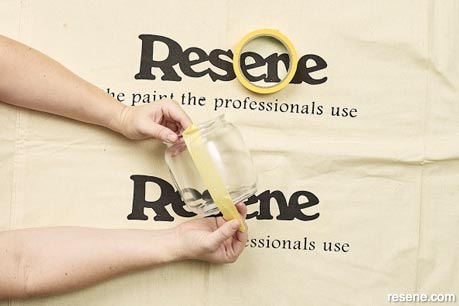 Step one
Clean the jar inside and out and let dry. Place washi tape down each side of the jar.
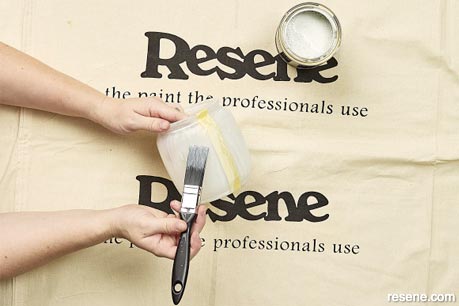 Step two
Apply a coat of Resene Waterborne Sureseal to the jar exterior.
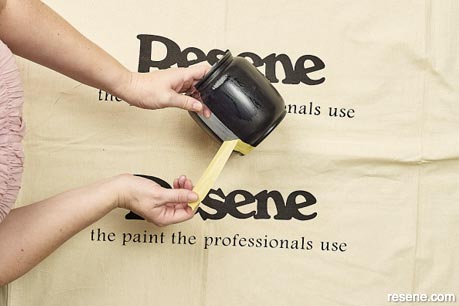
 Step three
Once dry, paint two layers of Resene FX Blackboard Paint or your chosen colour. Let dry between coats.
 Step four
Remove the washi tape.
 Step five
Dry overnight, then use chalk to personalise the blackboard jar or paint a message in a contrast colour.
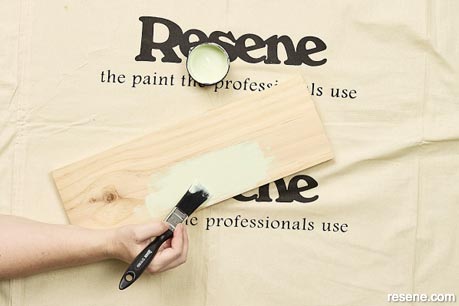
Wag-worthy
Keep your pup’s walking accessories in order with this nifty leash holder. Get creative with other shapes such as a paw print, doghouse or dog silhouette.
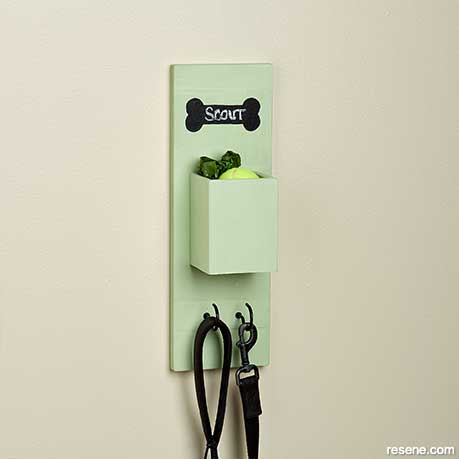
Wall painted in Resene Coconut Cream, leash holder in Resene Soft Apple and dog bone in Resene FX Blackboard Paint.
You’ll need:
- Piece of pine, measuring 400mm x 130mm
- Timber box – ours is a pencil holder, 120mm x 90mm x 90mm depth
- Drill, drill bits and screw
- 2 cup hooks
- Resene testpot brush
- Resene testpot in Resene Soft Apple
- Resene FX Blackboard Paint
- Artist’s brush
- Chalk
- Pencil
- Dog bone template (optional)
Instructions:
 Step one
Paint the pine and box in Resene Soft Apple. Let dry.
 Step two
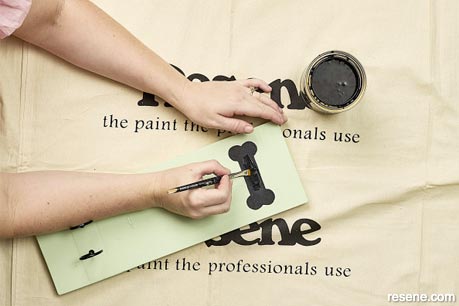
Use an artist’s brush to paint the shape for the name. Ours is in Resene FX Blackboard Paint in a dog bone shape.
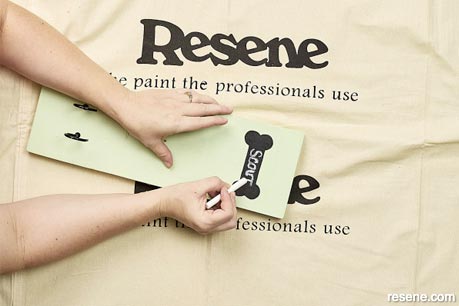 Step three
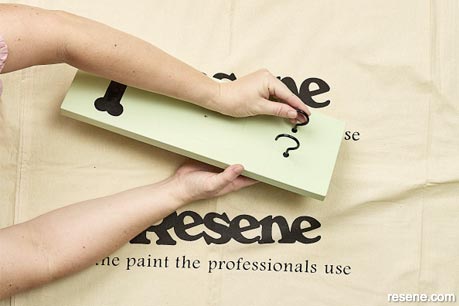
Once dry, write the name chalk.
 Step four
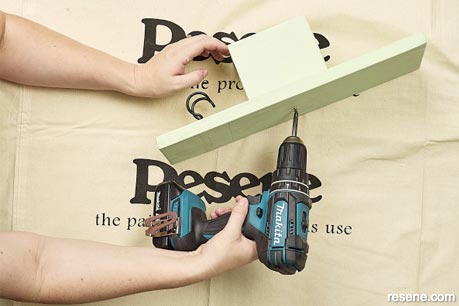
Screw the coat hooks to the bottom of the board.
 Step five
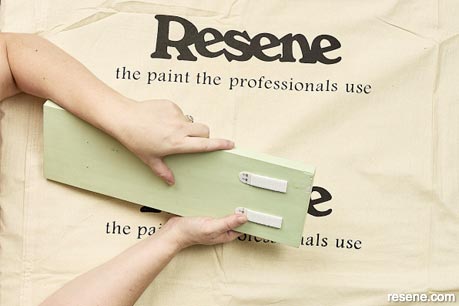
Screw the box to the pine piece, so it sits in the middle.
 Step six
Hang with strong picture hooks or screw to the wall.
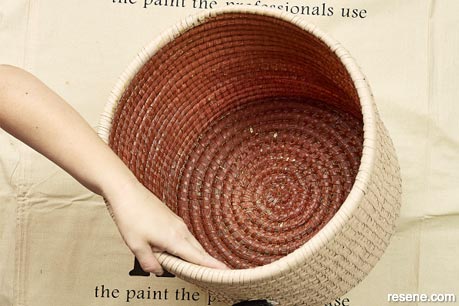
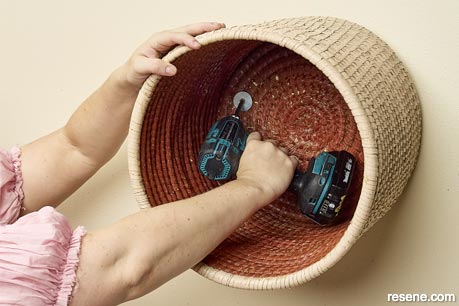
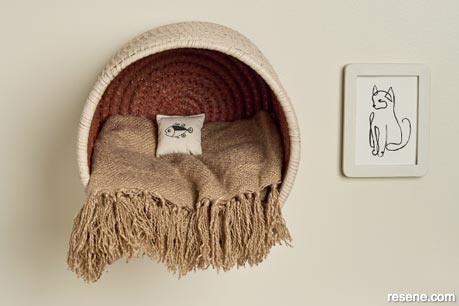
Catnap heaven
Home decor meets kitty comfort in this purr-fect wall-mounted cat bed.
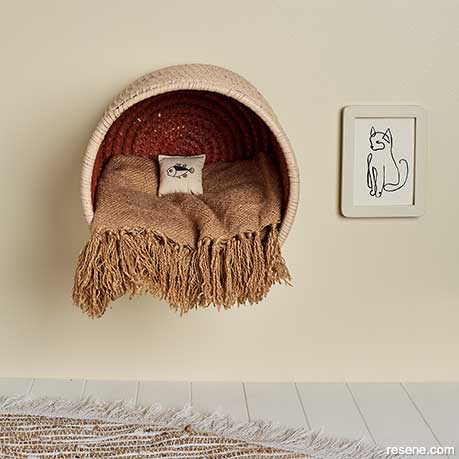
Wall painted in Resene Coconut Cream, floor in Resene Black White, basket in Resene Cashmere and Resene Mocha, picture frame in Resene Half Fossil and line painting in Resene Gumboot. Basket from Briscoes.
You'll need:
- Sturdy basket that will hold your cat's weight (we used size D34 x H32cm)
- Drill and drill bits
- 2 mudguard washers, 1/4 inch size, plus screws to fit
- Resene testpot brushes
- Resene testpots in Resene Cashmere and Resene Mocha
- Pencil, ruler and level
Instructions:
 Step one
Paint the basket in Resene Cashmere (outside) and Resene Mocha (inside). Let dry.
 Step two
Decide where to place the basket and mark places for screws through the base of the basket. Drill holes into the walls.
 Step three
Place the washers and screw through the basket into the pilot holes.
› For more fun project ideas, visit www.habitatbyresene.co.nz/tips
Colours mentioned in this project


Products mentioned in this article